
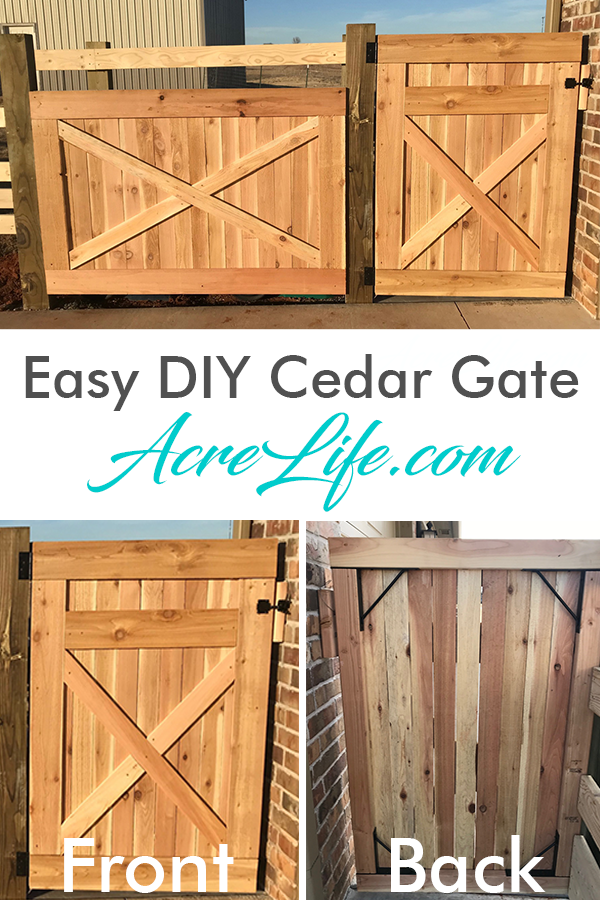
A good gate is essential to any fenced-in area. A gate that looks great too is even better! We recently fenced in an area to give our dog more room to run. You can follow my step-by-step guide to building a split rail fence. In addition to the fence, we built a cedar gate and a solid cedar fence to hide our trash cans.
The biggest issue that we have had with gates in the past is sagging over time. This cedar gate is small so we didn’t worry as much about sagging. However, it will be used often so we wanted to make sure that it would hold up.
Tools and Materials
- Drill
- Compound Miter Saw or Equivalent
- 2×4 Lumber
- 1x6x6 Cedar Fence Pickets
- 1x4x6 Cedar Fence Pickets
- 1 1/4″ Outdoor Screws
- EasyGate Hardware Kit
Building the Frame
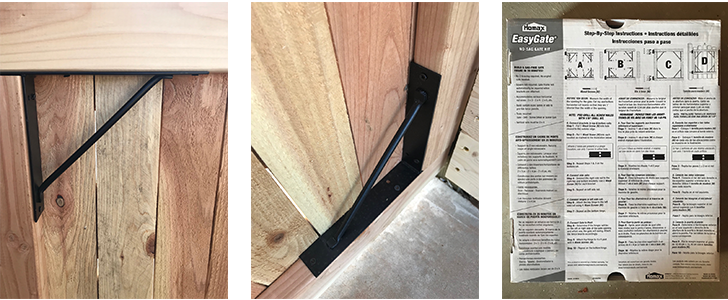
Every good structure needs a good base. We opted to go with a kit to build the frame. It gave us peace of mind knowing that our frame would be strong and also that it would be square. We used the EasyGate Hardware Kit to build the frame of our cedar gate.
Make sure that you have a flat, level surface to work on. We chose to use 2×4 studs for our frame kit. We weren’t concerned with what the gate looked like from the back and wanted to save money where we could. However, I think the gate looks great from the back already and will look even better once it is stained.

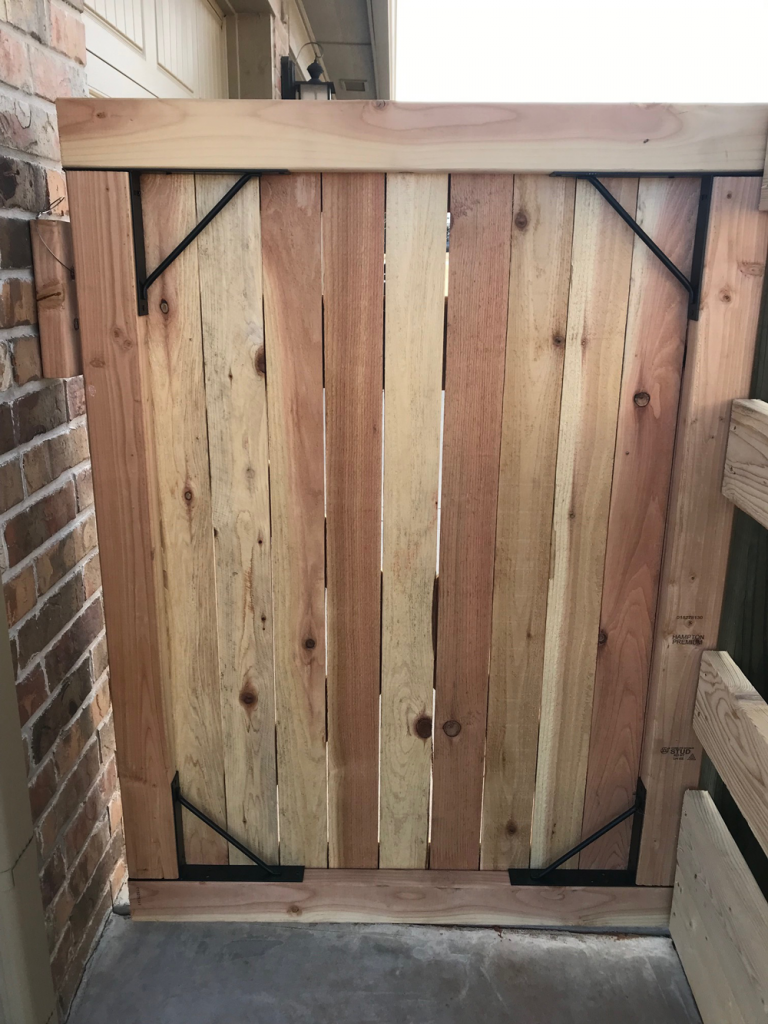
Decide how wide your gate needs to be and cut your top and bottom boards. Then decide how tall your gate needs to be and cut your side boards. Don’t forget to subtract the top and bottom boards from the total height.
Follow the instructions that come with the kit. I read some of the reviews (after) we built our gate and saw that many people had the same problem that we had with the provided drill bit. It broke. Don’t use it, it’s junk. Some of the reviews also said that their brackets weren’t square, but ours were fine and our gate turned out great. The directions said you could build a gate in 20 minutes but ours definitely took longer.

Attaching the Cedar Planks
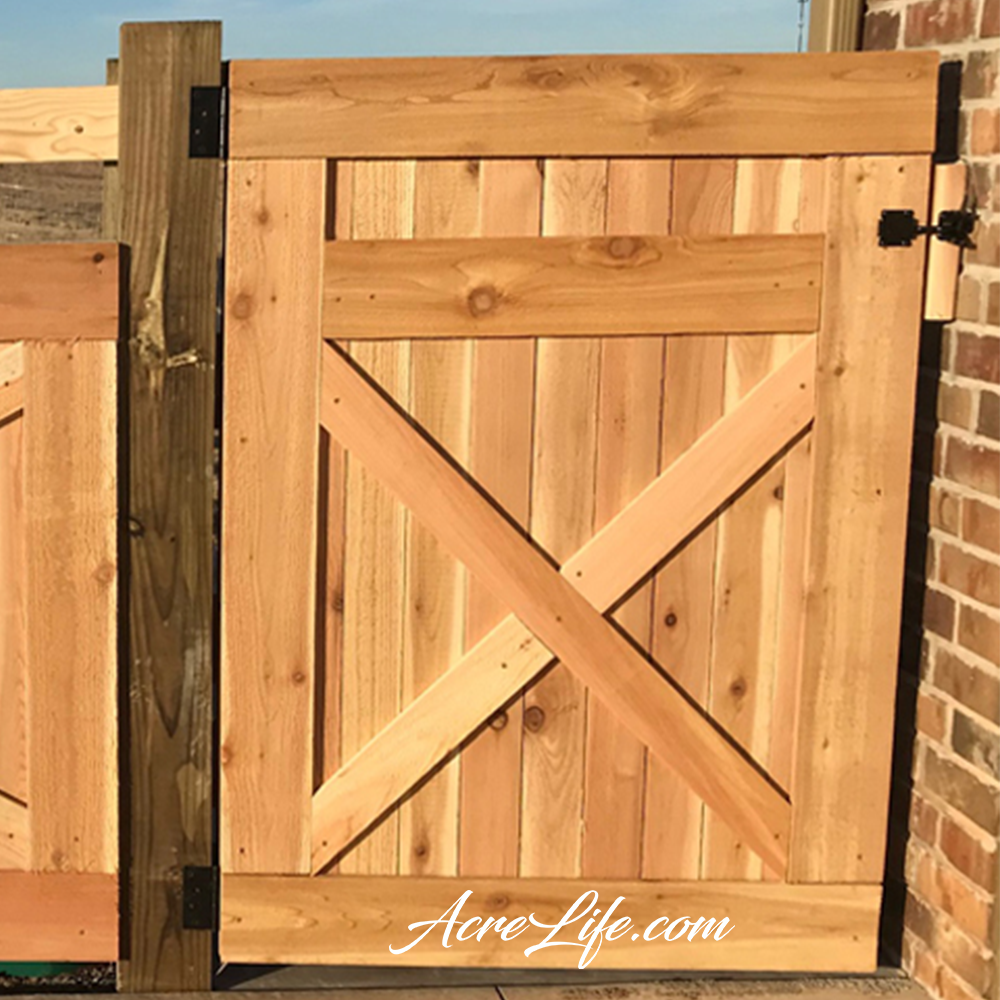
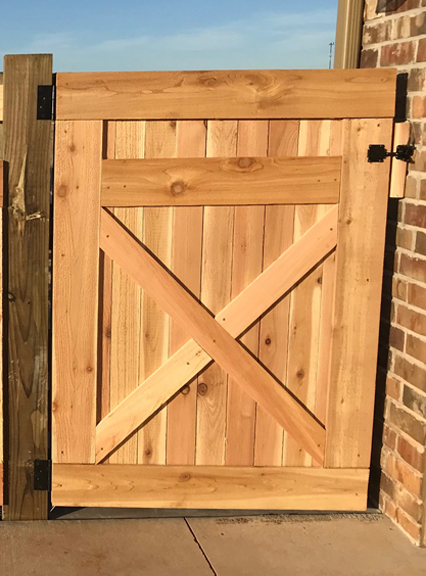
I would have loved to build our entire split rail fence out of cedar because I love the way it looks. But it was way too expensive. Putting the cedar pickets on the front out our gate frame made it look more expensive than it really was. The 1x4x6 pickets were about $2.00 each and we used 13 total. We also used 4 – 1x6x8 pickets to frame the gate.

We hung our frame first and then put the cedar pickets on after the gate was in place. By doing it this way the gate was lighter and easier to hang level with the post. You could also build the cedar gate completely and then attach it to your post if that makes more sense to you.
Cut your vertical pickets to the correct height of your gate. We had to cut the last picket vertically as well because it only needed to be 3 inches wide. We just used a hand saw for that cut.
Attaching the 1 x 4 Pickets
The actual measurements of the 1×4 pickets are 0.57-in x 3.5-in
on one side and line the picket up flush with the top and the side of your gate frame. Put a screw in the top of the picket and the bottom of the picket. Then move across the frame repeating the process until all of your vertical pickets are attached. Get each picket as close to the one next to it as you can so that there aren’t any gaps. We still had some gaps because the pickets weren’t cut perfectly but it didn’t bother me. I did spend a lot of time in the store picking out the best looking pickets that I could find.
Attaching the 1 x 6 Pickets
The actual measurements of the 1×6 pickets are 5/8-in x 5-1/2-in.
Measure and cut the first picket to fit the width of your cedar gate to go across the top. Cut another board the same width for the bottom. Attach the top board so that it is flush with the top of your gate. Attach the bottom board so that it is flush with the bottom of your gate.
Measure the distance between the top and bottom boards and cut two of those. Attach one so that it is flush with the left side of the gate. Attach the other one so that it is flush with the right side of the gate.
We added an additional horizontal board to ours so that it would match up to the fence that was beside it. You will probably skip that board.


Attaching the X Design
Cut a 1×4 picket at a 45-degree angle on both ends. Confession time. We are not skilled with angles or our saw so we held the board up and used a straight edge to draw a line at the top and bottom of the board where the cut needed to be. Don’t judge, it worked! And when we got the fence panel next to it, the 45-degree angle didn’t work so we had to use our method anyway.
Attach the board at both ends and add a screw to the middle. We had to be careful with these screws because they were only going into the 1×4 pickets behind them and we didn’t want the screws to poke out the back.
To complete the X mark your angles and where the crossbar will intersect the other board. Make your cuts and attach each end with screws.
Add Hardware
Now you can add a handle or latching hardware to complete your cedar gate. Because our gate is against our house we added a block of wood to the bricks using two lag bolts. Then we were able to attach the latch to the board. I’m not completely thrilled about the way that it looks so we may remove it and put a 2×4 that is the same height as the gate rather than having a small 2×4.
Finishing Touches
I am planning on putting a piece of cedar on top of the gate to act as a cap. I think it will keep water from getting in between the boards and causing issue with expanding and cracking. I’ll update if and when I add it.
The 4×6 posts are also going to get a cedar picket added to the front of them to dress them up and tie the whole thing together.
Now we wait for the wood to dry out so that we can add a weatherproofing stain.
If you are trying to figure out if stain or paint is best for your project read about the pros and cons of each. Which Finish Is Best For Your New Wood Fence?


Great instructions! I recently had a contractor install a new wood fence with a cedar gate in my backyard. But two months later, I decided I wanted to put another small fence with a gate for my large vegetable and herb garden. To save money, My husband and I followed your instructions for a DIY gate, and we made some adjustments to the sizing to make it smaller. It turned out great!!
Love these gates! Can’t wait to try and make one at our house when we replace our fence! Thanks for all the pictures and directions! Love your blog!